


Even though we get asked weekly whether or not anything may be cast into epoxy resin, we decided to write a blog post to share with you some of the most typically castable products.
The following is a list of some of the more frequent things that can be cast in epoxy resin, but, as is the case with any creative endeavor, there are always more items that may work. You should experiment with a few items if you are still apprehensive. When casting sentimental artifacts in resin, care must be taken to avoid damaging them; instead, an object with a similar appearance but less significance might be utilized.

Puzzle Pieces:
Craft glue's epoxy glue is great for gluing together the last piece of a puzzle. But before you do that, you must ensure it is securely fastened to a foundation so the pieces don't fall over the place. To do this, your puzzle will need to be measured, and then a piece of MDF board cut to those proportions will need to be glued to the puzzle.
The epoxy glue may also seep into the puzzle, making the pieces look darker than they are, especially at their edges. This style might appeal to you; it could be useful for your task, or it could not. Therefore, before gluing your puzzle together using epoxy, we advise sealing it. The epoxy glue may soak into the puzzle, darkening it.
You may need to apply more than one layer of gallon resin epoxy to cover anything like a puzzle because the individual pieces have spaces between them. When air is allowed to escape between the pieces of the puzzle, it typically results in the formation of bubbles, which, when allowed to deflate during the curing process, results in pitting. Applying a second coat may fill in these pitted regions and make the surface more even. After the initial coat of resin you apply has hardened, you must remember to sand it down so that the subsequent layer will attach properly to the previous one.

Aluminum Objects:
Epoxy glue from Craft glue adheres well to several metals, including aluminum. Among these metals is also aluminum. However, before applying the resin, you will need to prepare the surface of the metal by sanding away its top layer. Only then can you apply the resin.
Jewelry:
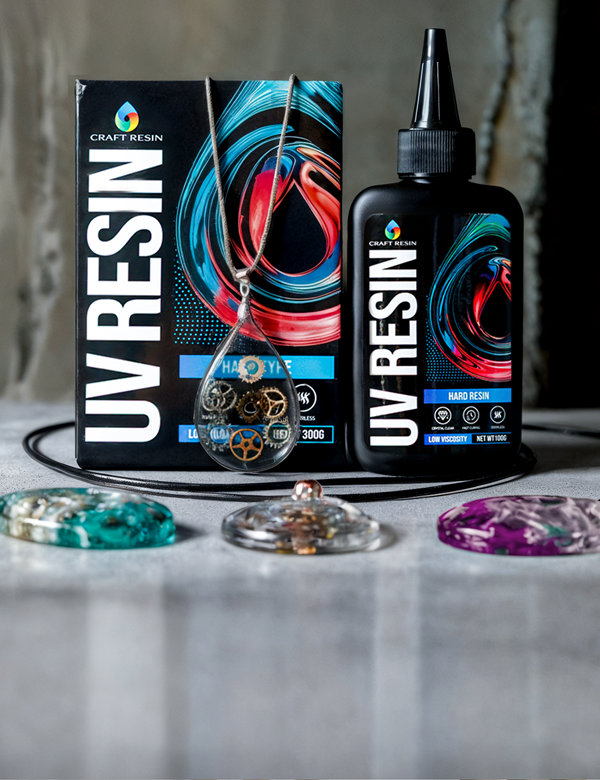
Craft Resin sells epoxy resin, which may be used to make a wide range of jewelry. Craft Resin may be used to create a wide variety of jewelry, including bangles, pendants, rings, and earrings. Molds or bezels can be used to pour the resin into for the creation of these. The bezels will add a lovely finish to your jewelry, and the molds will keep the resin in place.
Fabric:
However, Craft Resin will still make the fabric look damp and, after it has hardened, will cause the fabric to remain stiff. You should test the wet appearance on scrap fabric to see how it will affect your project's dyeing and final product.

Polymer clay:
On top of polymer clay, an epoxy resin coating from Craft Resin might be applied. This will shield the sculpture from the weather, make the construction more robust, and give it a more polished aspect. Epoxy resin should be put with a paintbrush and brushed over polymer clay sculptures once again, but this time, special care should be taken to ensure that the resin gets into every nook and cranny of the sculpture. Dipping them into a jug of craft resin is possible, but only if the sculpture you are working on needs more.
Ceramics:
Epoxy resin, such as that of Craft Resin, can be used to adhere ceramic tiles to walls permanently. Epoxy resin may be poured and placed directly onto ceramic tiles for a seamless finish. Painting the resin with a paintbrush and building it up in layers is a good option for covering a bowl or a sculpture that isn't flat.
Craft Resin should be allowed to cure completely before using ceramic plates that have been covered with it. Food may be safely prepared on surfaces made from Craft Resin.
Before applying resin, ceramics should be heated, as temperature shock is another issue that can arise with ceramics. Place the containers on a heat pad just a moment before pouring. When a hot resin mixture is applied to a ceramic surface, the surface may shrink, resulting in ripples or cracks in the product once it has been manufactured. If you warm the ceramics up beforehand, you won't have this problem.

Ashes:
In recent years, it has been a widespread practice to cast the ashes of a loved one into epoxy resin so that the owner can retain them forever. This allows the owner to preserve the ashes in perpetuity. It is also a widespread practice to scatter the ashes of loved ones and animals. Again, before you start, you must acquire the necessary abilities and practice them on less relevant work than what you'll eventually be doing. Test it first with something like sand, as that could have the same impact as ashes in resin.
Because ashes are so lightweight, they may float quite a bit in liquid epoxy glue. Ashes may look less concentrated if the epoxy resin is poured on top of them, as the resin will cause the ashes to spread out. Please think about what follows: It's important to remember that the ash flow's direction might sometimes be aesthetically pleasing but less so at other times.
Preparing your ashes ahead of time will ensure they don't scatter too much once you begin going. The ash can be placed in a small mold that has already been fashioned into the desired form. The next step is to pour a small amount of resin into the mold, incorporate the ashes into the resin, and let it cure for 24 hours. After that, you may include it in a larger resin project to perfectly encase it and guarantee that its shape is maintained. If you wish to use anything like a mold in the shape of a heart, you will have a flawlessly formed resin/ash heart piece to add to your bigger creations.
After the resin and hardener have been mixed for four minutes, the ashes can be added for the final minute of blending. Ash can also be used in a resin project during the mixing step. You may then pour them into your mold, despite the fact that there may be some movement even at this stage; nonetheless, this may be the effect that you are going for.
Because ashes, by themselves, might appear pretty drab, and because they become even more uninteresting when resin is put to them in the same manner as if they were wet, occasionally people sprinkle glitter on top of them to make them look more appealing.
While commencing work on ash-based efforts, having an in-depth chat with consumers about the perfect memorial project they envision for their loved ones is critical. Due to the fluid nature of resin, it is advisable to prepare them in advance for the likelihood that the look of the finished product would be different from what they had anticipated. When the resin has completely hardened, the ashes will be immobilized there for good.
If you put "adding ashes to resin" into the search bar on YouTube, you will be presented with a large number of relevant results. First, gain knowledge from the errors committed by others, and then either donate or sell the memorials you create.
As you can see from the magnificent memorial project completed below by a member of our Facebook Community Group who goes by the name Mandie Dite, ashes may be utilized to make something as beautiful and unique as the person or pet they memorialize. It is a heartfelt tribute to a member of her family who passed away:

Hair:
Many people feel deeply about memorial projects made from their beloved pets' hair or wish to cast their babies' locks of hair from their first haircut, etc. It might be repurposed into a sweet souvenir with a little TLC.
Since hair may now wiggle around in liquid resin mix, you should experiment with using a small amount of your hair before trying to sell resin hair sculptures. Dealing with hair may be a sentimental experience, much like dealing with ashes can be. Therefore, you should learn the basics first and only after that practice on less significant hair.
If you're casting hair, remember that it may end up sticking out of your finished product, and repeat the process of working in stages. You may add it to a larger project after it has been cast in a smaller mold in the desired shape. Alternately, gradually incorporate it into a larger project, cutting off excess.
If you are working on a project that other people will view, tell them that people's hair could look a little bit darker or like a wet look if they have been sweating. Because the hair itself may sometimes shine without adding other materials, adding colorant or glitter to a project that already contains hair can be excessive. This is because the hair itself can sometimes shine on its own.
Before you get started on any epoxy resin projects, there are a ton of how-to videos that can be found on YouTube. These films will guide you through adding hair to the crafts. Look at the piece "Forget Me Not Memories," created by C, for inspiration. She sandwiched a lock of hair between two hearts that had been embellished with lovely forget-me-not flowers and a touch of gold leaf.

Flowers:
Epoxy resin crafts can benefit from including dried flowers, but you'll need to remember that you can't use fresh flowers for these projects. After being preserved in epoxy resin for a few weeks, your stunning fresh flowers might not look as fantastic as when they were first preserved. Before undertaking any flower-related epoxy resin crafts, especially those with an emotional or commemorative focus, please read all of the detailed directions that we have provided:
How To Add Flowers In Epoxy Resin Blog
How To Make Flower Coasters YouTube Video

Sand/Shells/Pebbles:
Epoxy resin starter set is useful to create beautiful sculptures, and you can add beachy touches like sand, shells, and pebbles to complete the effect. Adding epoxy waves to them may give them the look of a beach scene that is both realistic and gorgeous.
Remember that if you apply the resin mix on heavier components like shells and stones while the resin is still liquid, those components will sink to the bottom of your sculptures. Allow the initial layer of epoxy glue beneath the shells to cure for a little while before adding the weighted items to ensure they protrude just enough to keep the objects from sinking to the bottom of the container.
The following additional instructions might be of use to you as you work on resin beach crafts:
How To Create Ocean Resin Art Blog
How To Create Ocean Waves Using Resin YouTube Video

Insects:
After the summer months, there is a trend of encasing insects and other small natural items, like butterflies, in epoxy resin to preserve them and display them for the long term.
Insects in resin tend to get a lot of positive feedback, but we also get a lot of comments from individuals who are concerned that an animal was hurt to create the artwork. We expect most of you already know this, but we'd like to clarify. Please do not injure any animals or insects to include in your crafts, and if you must include them, make sure they are dead before encasing them in epoxy resin.
There are also high-quality replicas of animals and insects so that you might substitute a reproduction for the actual item in your artwork's encapsulation. In a resin pond, for instance, replica fish may look quite lifelike.
Wood:
Resin furniture, including tables and cutting boards, has seen a surge in popularity in recent years. Not only may resin be used to coat wooden objects, but resin can also be used to cast wooden objects. We have a lot of resources for making things from wood and resin, so be sure to check out the wood guidance offered below:
Working With Wood & Epoxy Resin Blog

Glitter:
Including elements such as glitter in your creations may lend them an eye-catching sheen and help them stand out from the crowd. Adding glitter to epoxy resin projects can make the finished products appear more sophisticated and captivating. Please take into consideration, once more, that glitters have the potential to move around in liquid epoxy resin and can also sink to the base of sculptures. Experimenting with various glitters and glitter colors and seeing how the glitters form and move around in your creations as they cure is a must if you want to get the best results.
Beads:
Beads, for instance, may be an excellent addition to creations made with epoxy resin. We recommend that you stock up on a broad selection of such items and experiment with them to determine what you like most and how they behave in various crafts. Be aware of the possibility that they will once more settle at the base of your constructions.
Stickers:
You may also incorporate items like stickers into your designs. However, depending on the paper used for the stickers, it is recommended that the stickers be primed with a product like Mod Podge before the resin is applied to them. This will ensure that the stickers do not fall apart due to the resin getting on them. Priming will provide a protective layer, allowing you to pour resin over it without any concerns.
If you think about stickers like you do images and follow the same kind of advice you would while casting photos, you should make sure everything is correct.

Plastic Trinkets:
Toys and other plastic items can be cast into epoxy resin since it bonds to other plastics (but not silicone). You may also cast in epoxy resin your child's favorite toy cars or action hero figures from when they were small and use them to make a diorama.
As popular as they are, epoxy resin pyramids might benefit from including such items.
Cutoffs From Other Resin Projects:
You may greatly limit the quantity of epoxy resin you throw away by reusing the scraps you remove from completed projects. Once the epoxy glue drips have cured on a plastic table cover, you may break them into little pieces and use them as decorative accents for your new projects.
These are also known as terrazzo chips, and we're big fans of what @priscriptionresin has been doing with them to make visually spectacular works of art in a wide range of colors. To see more of her fantastic work, visit her profile by clicking on the image below:

Crystals:
Crystals, which you would want to integrate into your magnificent resin geode sculptures, are naturally rather pricey, as is geode art. However, you might use crystals to your advantage by using resin. You may make your crystals using epoxy resin, saving you money, particularly at the beginning of the process.
Epoxy resin may have crystals added to it without any issues occurring, regardless of whether the crystals are real or fake. A remarkable sensation of depth and three-dimensionality is added to most geode paintings by including crystals that have been left sticking out from the surface.
Crystals can be encapsulated by completely coating them with resin. However, colored crystals will be more evident in the final product than transparent ones.

Gold leaf:
Glitter that looks like gold leaf may give your resin creations another incredibly lovely appearance. This glitter can be placed on the top of our crafts and then covered with a coating of resin painted on them to lock it in, or it can again be blended into your creation into the liquid epoxy resin before it cures. Both of these methods can be used.
However, several tutorials on YouTube will teach you how to do it effectively. Although using gold leaf may be rather tricky, and this may take some time to master, hundreds of videos will show you how to do it successfully.
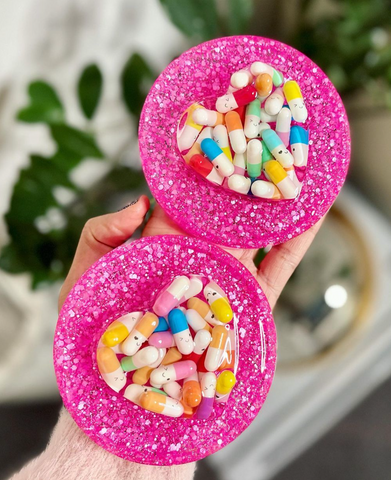
Pills:
This is a somewhat peculiar thing, but the people at @prescritionresin have recently been inspiring us with their great pill-based artwork, so we thought we'd share it with you. Although you should avoid wasting any of your prescription medications on resin art, you can add some intriguing elements to your sculptures by making use of tablets that have outlived their expiration date and would otherwise be discarded.
Click on the image that follows to be motivated by the creative endeavors of @prescription_resin:
Coffee Beans:
Epoxy resin artworks can also incorporate coffee beans or other commonplace objects. It makes sense, and if you're manufacturing coffee coasters, they go well with what you're doing since they relate to your product.
The coffee beans can be mixed into the resin or put on top without any pretreatment. Since they are denser than the resin, they will once again settle to the bottom of the mold. If you want them to protrude from the bottom of the mold, you should wait until the resin mixture has started to harden up before inserting them.

Food:
Putting food into epoxy glue is a strange way to waste food. Let us reassure you that your feelings are shared if that is what you are thinking. Lol. However, people enjoy building unique objects and trying out new combinations of components.
To complete a special assignment for Chicago Town Pizza, we offered some of our resin to the amazing artist @fuzzycomma. The following image should give you a good idea of what was involved in the project. As part of one of their holiday marketing campaigns, the company was asked to cast pizzas in epoxy resin so they could be hung on the Christmas Tree, and a creative photo shoot was planned to capture the moment.
According to our conversation with Alison from Fuzzy Comma, the pizzas were only good for a few days during filming. Alison has yet to determine if they are still edible today.
They can deteriorate in epoxy resin just as any other organic material or food would if left there for too long. Hotdogs and hamburgers have been known to last for years after being cast in epoxy resin. So, it's feasible that other processed food categories would do better than fresh ones in a similar experiment.

Will materials Craft Resin NOT stick to?
As shown above, epoxy resin from Craft Resin may be used on a broad range of materials. However, it is not suggested for use with the following (which is by no means a complete list): plastics, rubber, metals, and some types of wood.
- Paint tarps made of disposable plastic
- Plastic grocery and sandwich bags
- Molds made of silicone, or anything else made of silicone for that matter
- The side of the glossy tape that is not adhesive
Artists may use these supplies to mix, pour, and clean up their resin without having to resort to goods that are only good for a single use, which can be a significant time saver. For example, silicone mixing jugs may be used to mix resin, then left to cure in the jugs before being folded out, wiped clean, and used repeatedly. This process can be repeated as many times as necessary.
Feel free to share your successes (or failures) with the application of Craft Resin to items or materials that should be advised in the comments area of this article. We may have neglected some truly bizarre things that other people may use as inspiration for their innovations, but we're sure there are plenty out there.
Topic Of The Week Giveaway:
We have attached a giveaway to this Topic Of The Week announcement on our Instagram platform; this is helping us to spread the knowledge of how to use epoxy resin further, but also enabling anyone who helps us to share this information to win free resin and mica powders.

To enter the weekly giveaway, please see the latest post pinned to the top of our Instagram feed and follow the instructions to enter:
Team Craft Resin
